Accidentally deleted a Facebook message you wanted to keep? Don’t panic! This wikiHow article will guide you through methods to recover your deleted Facebook messages and offer tips to prevent future message loss.
Reading Erased Facebook Messages
If you accidentally deleted a Facebook message you wanted to keep, you can check for an email notification or search the Messenger App cache (available on Android only). If the message isn’t in your archived conversations, consider asking the person you were chatting with for a screenshot of it.
Method 1: Recover Facebook Archived Conversations
Step 1: Open the Messenger app on your Android, iPhone, or iPad. There’s a good chance your missing messages were archived instead of deleted. Permanently deleting a conversation in the mobile version of Messenger involves more steps than archiving, so it’s common for people to choose the Archive option instead.
- If you permanently deleted the message, you would have seen a warning indicating that the deletion is permanent and that there’s no way to restore the message. If you don’t recall seeing such a warning, check the archive!
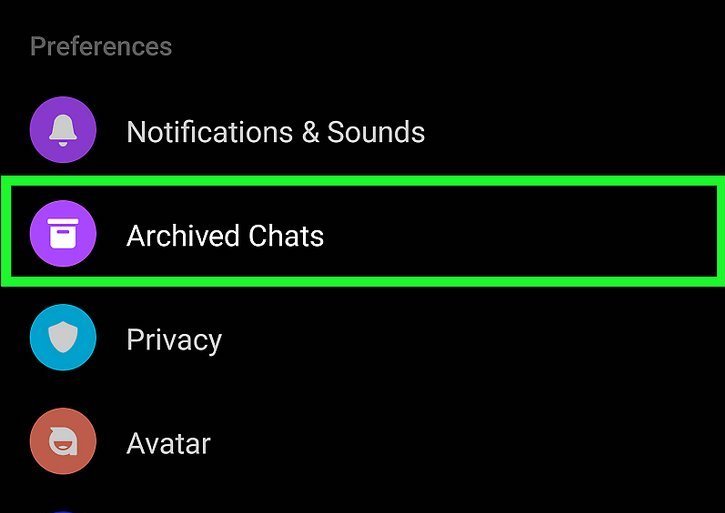
Step 2: Tap your profile photo at the top-left corner of Messenger.
Step 3: Tap ‘Archived Chats’ to see a list of your archived conversations.
Step 4: Swipe left on the deleted conversation to reveal some options.
Step 5: Select ‘Unarchive chat’ or ‘Unarchive.’ The available option may differ depending on your platform. This action will move the archived conversation back to your inbox.
Method 2: Ask the Other Person
Step 1: Scroll through your messages: Before you set out on a quest to retrieve or come to terms with your lost messages, go through your Facebook Messenger inbox and look for the chat you believe you deleted. There’s a possibility that your conversation just got buried under newer ones.
Step 2: Search for a name or keyword: If you can’t find what you’re looking for in your inbox, tap the search bar at the top and look for any names or keywords you remember from the message. If you skipped over the message while scrolling, you might find it this way.
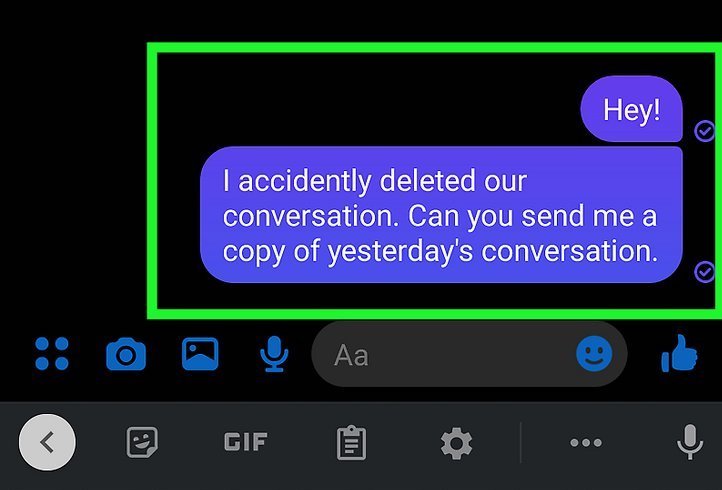
Step 3: Ask your chat partner(s) for a copy: Fortunately, deleting a message only removes it from your inbox, not the inboxes of others in the conversation. If you can’t find the message in your inbox (and it’s not archived), reach out to the person or people you were chatting with and ask them to take a screenshot for you.
Method 3: Check Your Downloaded Data
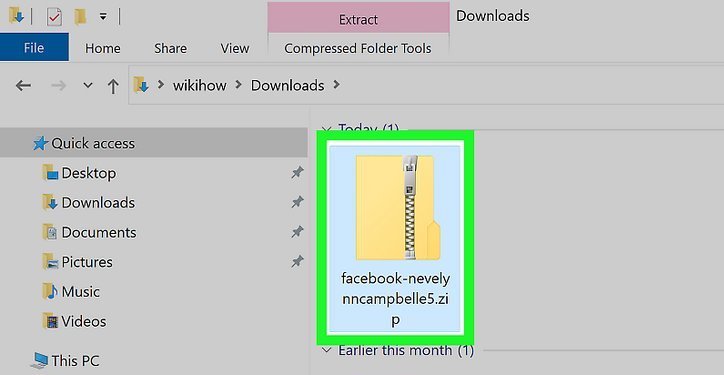
Step 1: Retrieve your downloaded data on your computer: Have you ever utilized Facebook’s “Download Your Information” feature to save your personal data to your computer? If so, you likely have copies of your messages in the archive. The downloaded ZIP file will be named “facebook-yourusername.zip,” and if you’ve unzipped it, you’ll have a folder called “facebook-yourusername.”
- It won’t help to download your archive now, as the deleted message won’t be in a new archive. However, if you downloaded your data before deleting the message, you’ll have a record of the conversation up to the moment you deleted it.
- If you created the archive before sending or receiving the message you want to restore, the message won’t be in the archive.
Step 2: Unzip the archived file: If you haven’t already unzipped the file, you can do it easily. On a Mac, just double-click the file to unzip it. For Windows users, follow these steps:
- Double-click the file beginning with “facebook” and ending with “.zip.”
- Click “Extract all” at the top.
- Ensure there’s a checkmark next to “Show extracted files” and click “Extract.”
- Double-click the file named “your_messages.html” to open the messages in your default web browser.
Step 3: Double-click the “Messages” folder: It’s inside the unzipped folder that starts with “Facebook” and ends with your username.
- If there is no “Messages” folder in your archive, you didn’t choose to include messages in your archive before downloading.
Step 4: Double-click “your_messages.html”: This will open a list of all your messages in your default web browser.
Step 5: Click the conversation you’re looking for: This will display all messages in the conversation as of the moment you created the archive. Hopefully, this includes the message you’re seeking!
Method 4: Back Up Facebook Messages in the Future
Step 1: Visit facebook.com on a computer. Regularly backing up your Facebook data ensures you’ll always have copies of your chats, posts, photos, and other important data in case of accidental deletion.
- Backups can only be created on a computer, not on a phone or tablet.
Step 2: Click the down arrow in the top-right corner to expand a menu.
Step 3: Click ‘Settings & Privacy’ from the menu to reveal additional options.
Step 4: Select ‘Settings’ in the Settings & Privacy menu.
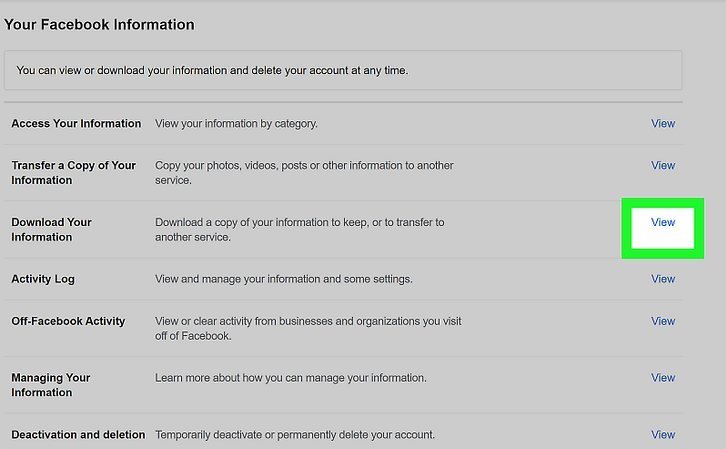
Step 5: Click ‘Your Facebook Information’ in the left panel near the top.
Step 6: Click ‘View’ next to ‘Download Your Information,’ the third option in the right panel.
Step 7: Choose a time range for the data you want to download by clicking ‘Select Dates,’ picking your start and end points, and then clicking ‘Update.’
Step 8: Check the boxes for everything you want to archive. Make sure to check ‘Messages’ to download your chats.
- If you only want to back up your messages, select ‘Messages’ and uncheck the other options.
Step 9: Click the ‘Create File’ button below the date range. Facebook will build your archive and notify you when it’s ready to download.
- Typically, Facebook prepares your download within 10 minutes, but the time may vary depending on the number of conversations in your inbox and the amount of information included in the archive.
- Once you receive the confirmation email or notification from Facebook, click the link and follow the on-screen instructions to download your backup.