![How to Hide Private Photos [Use iPhone Hidden Album]](https://devicetransfer.com/wp-content/uploads/2025/02/How-to-Hide-Private-Photos.jpg)
With iOS 16 and newer, you can create a hidden photo album on your iPhone, safeguarding your most private photos and videos in the Photos app. This hidden album is protected by Face ID or Touch ID, ensuring only you can access it. These hidden photos and videos won’t appear in your main library or other albums, but you can unhide them at any time.
For those using earlier versions of iOS, you can still hide photos and videos, but you’ll need a third-party app to lock the album. This guide will walk you through the steps of creating a locked private photo album on your iPhone.
Fast Facts for Creating Hidden Albums on iPhone
- Hide Photos: Tap the three dots on a photo and select “Hide” to move it to your Hidden album.
- Show/Hide Hidden Album: Go to Settings > Apps > Photos, and toggle “Show Hidden Album” on or off to control its visibility in the Photos app.
- Face ID/Touch ID Protection: Even if your Hidden album is visible in Photos, the private photos and videos will only be accessible with Face ID or Touch ID.
Hiding Your Photos on iPhone
- Open the Photos App:
- Tap All at the bottom to display all your unhidden photos and videos.
- On iOS 17 and earlier, use the Libraries tab to view all your photos.
- For iOS 16 (or iPadOS 16 on an iPad), any private photo album you create will be protected by Touch ID or Face ID.
- On iOS 14 and iOS 15, you can’t lock the album, but you can hide it completely so nobody knows it’s there.
- Select Photos or Videos to Hide:
- Choose the photo or video you want to hide.
- To add multiple items, tap Select at the top-left corner, then select the photos and videos you want to add.
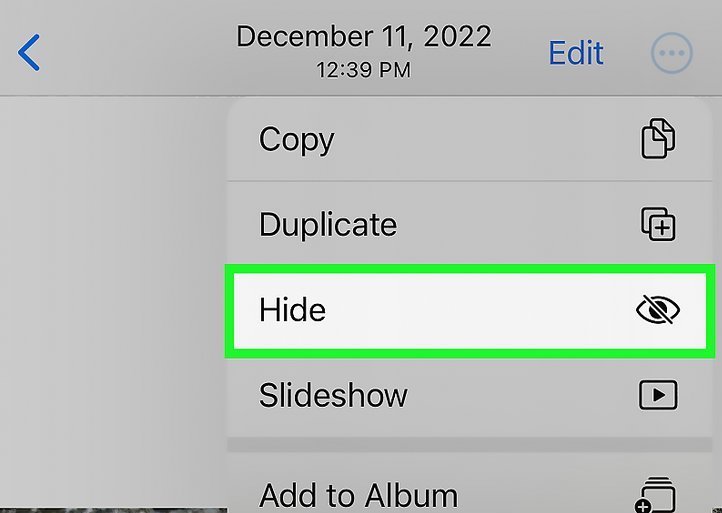
- Access the Three-Dot Menu:
- For a single photo or video, the three-dot menu (•••) is at the top-right.
- If you selected multiple items, it’ll be at the bottom-right.
- Hide the Selected Items:
- Tap Hide.
- Confirm by selecting Hide Photo or Hide Video in the dialog box that appears. This will move the selected items to the Hidden album, which is only visible to you.
- For multiple photos, you’ll see Hide [number] Photos.
Viewing the Private Album on iPhone
Make Your Hidden Album Visible:
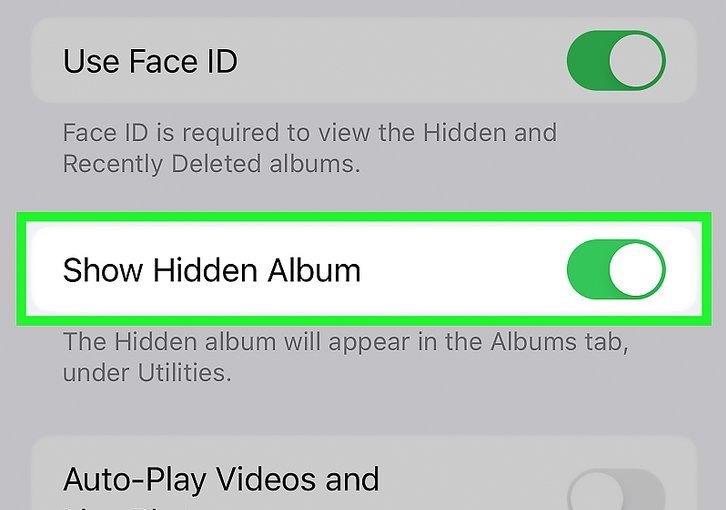
Open the Settings App:
- Tap Apps. (For iOS 17 and earlier, find Photos directly in the main Settings menu.)
- Scroll down and tap Photos.
- Toggle the switch next to Show Hidden Album so it turns green. This adds an album called “Hidden” to your Albums list.
- On iOS 16 and later, everything in the Hidden album remains private and protected even if “Show Hidden Album” is enabled. While someone can see that you have a hidden album, they can’t access its contents without Touch ID or Face ID.
- On iOS 14 and iOS 15, the Hidden album is not protected by Touch ID or Face ID. To keep it private, disable “Show Hidden Album” when you’re finished viewing your private photos.
Open the Photos App and Scroll Down to Utilities:
- For iOS 18 and later, simply scroll down from the main screen in Photos to find the Utilities header.
- For earlier versions, tap Albums, then scroll down to Utilities.
Tap the Hidden Album to View the Photos:
- Although the album is visible, its contents remain hidden until you unlock it with Face ID or Touch ID.
- Once unlocked, you can freely view all your hidden photos and videos.
- To remove a photo or video from your private album, tap the three dots on the photo, then tap Unhide.
Navigate Away to Lock the Hidden Album Instantly:
- Even if the Hidden album is visible, it will require Face ID or Touch ID to unlock again as soon as you switch to a different album or app, or if you lock your screen.
Hide the Hidden Album Again (Optional):
- If you haven’t updated to iOS 16 or later, or if you prefer not to see “Hidden” in your Albums list, you can hide it in your Settings. You’ll still be able to add new photos and videos to the album using the Hide feature, even while the album is hidden.
- Open the Settings app.
- Scroll down and tap Apps > Photos (or just Photos in iOS 17 and earlier).
- Toggle the switch next to Show Hidden Album to turn it Off (gray).
Locking Your Photos App (iOS 18 and Later)
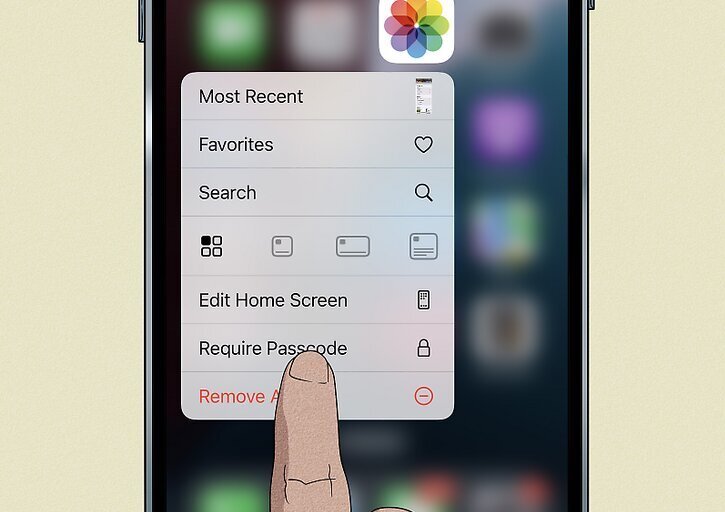
1. Tap and Hold the Photos App Icon:
- If you have iOS 18 or later, you can lock your entire Photos app so that only you can open it. This provides a quick and easy solution for making your photos private without selectively hiding specific images. To begin, locate the Photos app icon on your Home Screen or in the App Library, then tap and hold it.
2. Select “Require Face ID”:
- Depending on your iPhone model and settings, you might see the option to require Touch ID or a passcode instead.
- Confirm your selection in the notification that pops up.
- The next time you launch the Photos app, you’ll need to authenticate your identity using Face ID, Touch ID, or your passcode.
- To remove the lock, press and hold the app icon again, then select “Don’t Require Face ID” (or Touch ID or Passcode). You’ll need to verify your choice by authenticating with Face ID, Touch ID, or your passcode.
Other Private Album Options
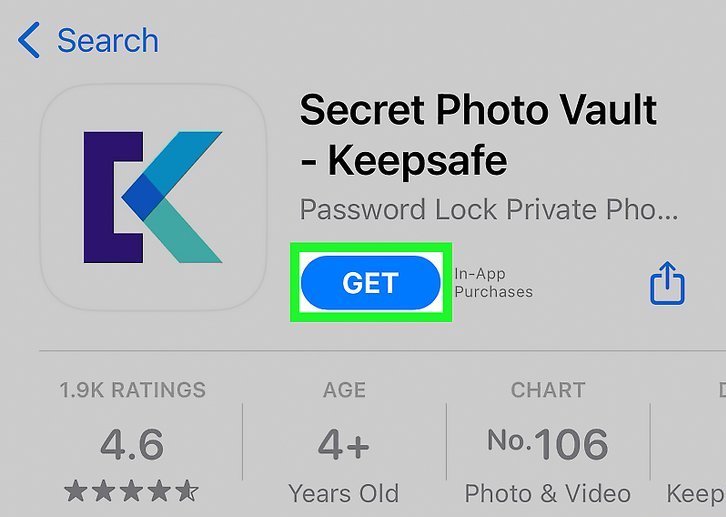
If you haven’t updated to iOS 16 or need more features, there are plenty of apps available. While most private album apps aren’t free, they usually come at a low cost. Many private album apps also offer free trials, allowing you to test them out before purchasing.
- KeepSafe Secret Photo Vault: A popular option for hiding photos, videos, and other personal documents. A free account allows you to back up a limited number of photos and create multiple private albums. Upgrading offers more PIN and backup options.
- Best Secret Folder: This app is free for storing photos privately on your iPhone, but you’ll need a subscription for additional privacy features, including cloud storage and break-in detection.
- Private Photo Vault: A highly reviewed premium photo vault app with a limited free version. The free version stores private photos on your iPhone, but upgrading is necessary to create decoy albums or back up your photos.